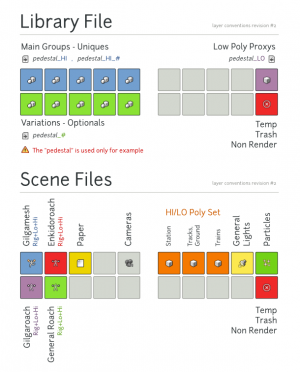
Creating a linkable asset
Views
Actions
Namespaces
Variants
Tools
Introduction
Asset creation is in the start of our pipeline: it will get used and affect everybody down the line. this is why we have some tools and guidelines to make things easier.
the main ways people get affected by the model file is:
- polygon count: while I'm not giving strict requirements, be reasonable and it is ok- millions of polies is probably too much.
- object count: blender is pretty bad at handling lots of objects! this hit us badly for instance, in the train file (created by a talented but inexperienced modeler) : high poly count and high object count, resulting in extreme slowness.
- topology and clean-ness of model of course
- object and object data names: If you don't name everything it is very hard to understand.
- really slow modifiers: we suffered from this and now we try to keep it down, even applying some modifiers to get better frame rates (like arrays)
Since an anim file will link in several models, and then the lighting file links in the anim files and some more models, you get a compounding affect, where something acceptable at the beginning (modeling) is now causing problem at the end (lighting).
Linkable assets/library assets in this context are blender data, python scripts or image data, stored in the project directory structure.
General Asset Instructions
These will all live in lib/ under some subfolders.
Models To be Linked in shots
All the models to be linked as groups in scene/shot files.
- Use as much as possible the project layer guidelines.
- Use the layer names addon to document any layers you use.
- Name every object, material, object data, texture, etc. in the file. We do not yet have a consistent naming convention, advice is to look at an existing file, e.g. gilgamesh.blend or roach.blend,both in lib/chars before starting.
- Create groups of your work, with good names.
- Make sure you use the dupli group layer visibility buttons, so only appropriate layers are visible when the groups are linked.
- Make sure you include everything in the group. This includes e.g. Bone shapes for the rigs, curve bevel profiles, etc. Not doing so can create a mess in scene files, and in the worse case, cause dependency lags for animators.
- Use Blendflakes. New assets should not be added until they pass all tests, old assets can have exceptions, but it is encouraged to get them up to snuff.
- Make your asset reference deskable
Characters, or models with rigs
Use the armature layer names addon to name your armature layers. This will allow you and others to edit the file with ease. Do not place any bones on layers that you do not name. Follow the guidelines for models in general, note we prefer:
- Every bone should have a name. No Bone.089 allowed. Suggest either naming them as you make them, or use python to help yourself out.
- Complex rigs should have a control armature separate from the deform armature.
- Control armatures should always be called 'rig' for consistent proxifying.
- bone prefixes should be used: controls should as much as possible be prefix free, while GEO_ refers to geometry bones that correspond to major deform groups e.g. GEO_bicep. DEF_ refers to bones that correct deformations, such as little stretch tos and fan bones e.g. DEF_elbowfix. only GEO_ and DEF_ bones should have deform on. HLP_ refers to bones that are helpers- they either drive constraints, or are parents to other bones. But they are not controls. Other prefixes are IK_ for IK chain bones, FK_ for FK chain bones, TAR_ for targets of IKs or stretch tos.
- Fingers are named Thumb, Roy, Leon, Zora, Pris.
- we use upperarm/lowerarm, upperleg/lowerleg for limbs.
- do not use a control for deformation directly. You may use them as driver and constraint targets.
- make low poly proxies if needed, so the rig plays back at 24 fps.
